Using the VB6 File System Controls in VB.NET
(DriveListBox, DirListBox, FileListBox)
VB6 provided three native toolbox controls for working with the file system: the DriveListBox, DirListBox, and FileListBox. These controls could be used independently, or in concert with one another to navigate the file system. In VB.NET (VB 20XX) there is no direct equivalent of these controls.However, through the use of the Microsoft.VisualBasic.Compatibility library, it is possible to use legacy VB6 controls in a VB.NET application. In general, the use of the compatibility library is discouraged, particularly for new applications, as it was created primarily to ease upgrading VB6 applications to VB.NET.
As far as the file system controls are concerned, Microsoft recommends that the dialog controls (OpenFIleDialog, SaveFileDialog) be used instead to accomplish the same functionality. While the dialog controls are certainly what you would want to use in most cases, the VB6 file system controls provided a way to present an alternative interface to interact with the file system that did not involve a dialog popping up; instead everything could be "right there" on the screen. True, you could build equivalent functionality using standard VB.NET controls: a drive list box could be easily made with a combobox, and a file list box could be easily made with a listbox; however, the directory list box would require the use of a treeview and logic to drill down the directory levels. Plus, extra code would be necessary to have these controls work together. The built-in functionality of the legacy file system controls is convenient and available, and this article shows you how to take advantage of it, should you choose to go in that direction.
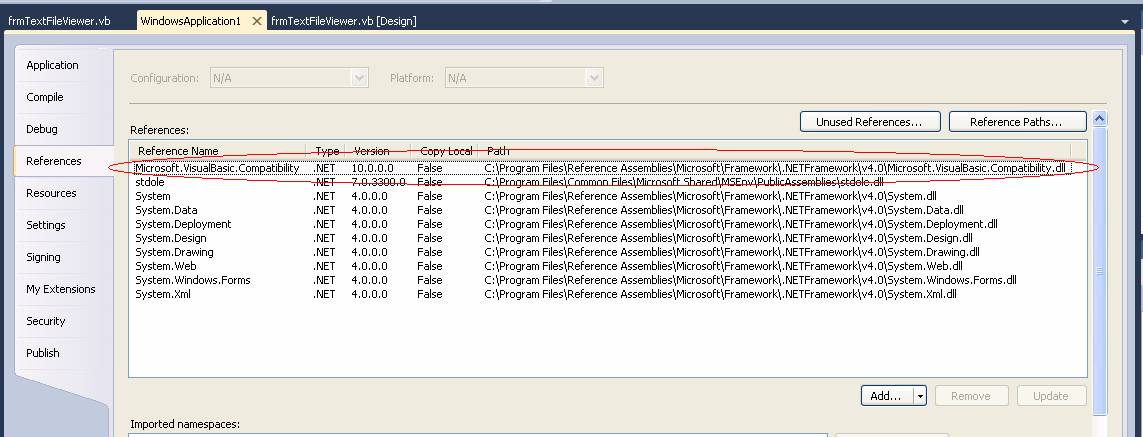
First, you'll need a reference to Microsoft.VisualBasic.Compatibility.dll, which is located (on my system) in C:\Program Files\Reference Assemblies\Microsoft\.NET Framework\v4.0. To add this reference, go to Project à Properties, and on the References tab, add that in by clicking on the "Add…" button and navigating that folder structure to get to the dll:
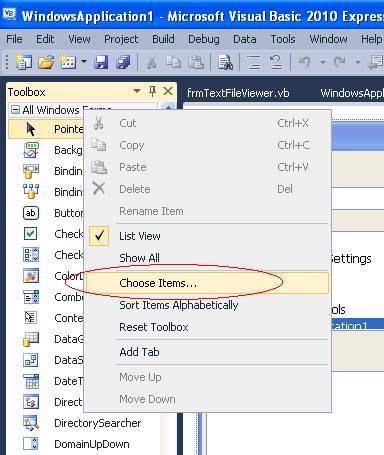
You''ll also need to add these three controls (the DriveListBox, DirListBox, and FileListBox) to your toolbox. The steps to do so are shown below:
|
Right click anywhere within the toolbox and select "Choose Items…". |
|
|
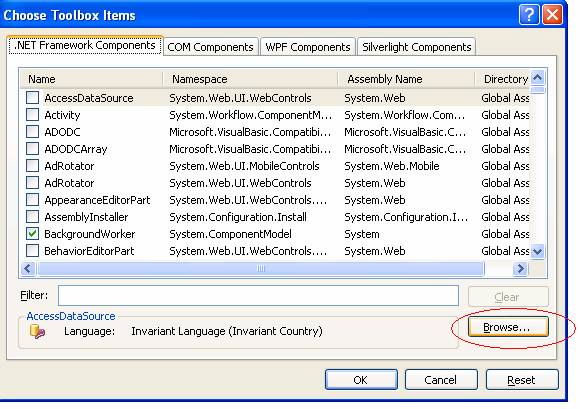
In the "Choose Toolbox Items" dialog, on the ".NET Framework Components" tab, click "Browse". |
|
|
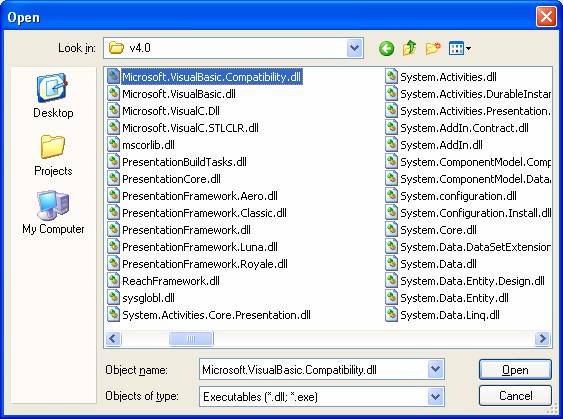
Navigate to Microsoft.VisualBasic.Compatibility.dll, which is located (on my system) in C:\Program Files\Reference Assemblies\Microsoft\.NET Framework\v4.0, and click "Open". |
|
|
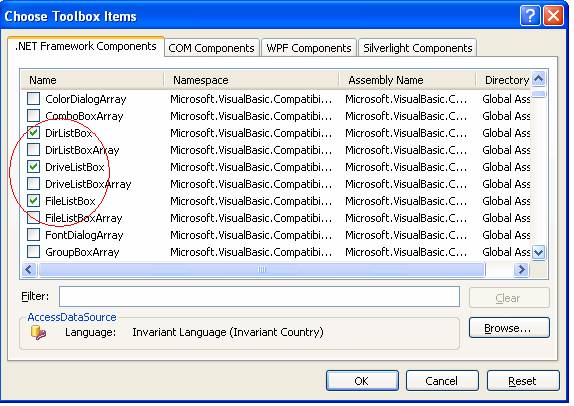
Back in the "Choose Toolbox Items" dialog, check the three controls controls (DriveListBox, DirListBox, and FileListBox). You may find it easier to sort the list by the "Namespace" column first. When all three are checked, click "OK". |
|
|
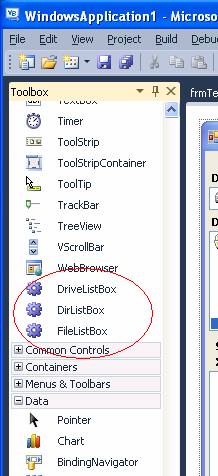
The three controls should then show up in the toolbox. |
|
|
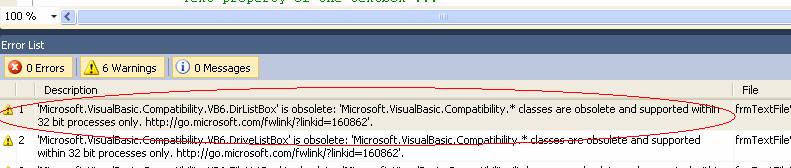
Note: You may get warnings stating that the various controls are obsolete. This is not a major concern at this time. On a search for more information on this warning, I came across the following Q & A on a programming forum:
Dear Doc Detective,
I have an application that was originally upgraded from Visual Basic 6.0 several years ago. After opening the app in Visual Studio 2010 and changing it to use the latest version of the .NET Framework, I’m seeing warnings in the error list.
Basically the errors state that various members of the Microsoft.VisualBasic.Compatibility.VB6 namespace are obsolete. Does this mean that I’ve reached a dead-end with my upgraded application? Please tell me that I don’t have to rewrite my application.
- Troubled in Troutdale
Dear Troubled,
You don’t have to rewrite your application. The warning is somewhat benign - your application will still work just fine in Visual Studio 2010. What the warning actually means is that the Compatibility namespace will not be included in some future version of the .NET Framework.
While this may sound ominous, the actual impact is minimal. If the namespaces are removed from the framework, it simply means that you might need to package the assembly that contains them and deploy it with your application.
By the time this actually happens, your application will probably be more than ten years old. At that point, rewriting your application might not be such a bad idea - but you still won’t have to.
- Doctor D
|
|
The DriveListBox control is a specialized drop-down list that displays a list of all the valid drives on the user's system. The most important property of the DriveListBox is the Drive property, which is set when the user selects an entry from the drop-down list or when you assign a drive string (such as "C:") to the Drive property in code. You can also read the Drive property to see which drive has been selected.
To make a DirListBox display the directories of the currently selected drive, you would set the Path property of the DirListBox control to the Drive property of the DriveListBox control in the Change event of the DriveListBox, as in the following statement:
Dir1.Path = Drive1.Drive
The DirListBox control displays a hierarchical list of the user's disk directories and subdirectories and automatically reacts to mouse clicks to allow the user to navigate among them. To synchronize the path selected in the DirListBox with a FileListBox, assign the Path property of the DirListBox to the Path property of the FileListBox in the Change event of the DirListBox, as in the following statement:
File1.Path = Dir1.Path
The FileListBox control lists files in the directory specified by its Path property. You can display all the files in the current directory, or you can use the Pattern property to show only certain types of files.
Similar to the VB6 ListBox and ComboBox controls, you can reference the List, ListCount, and ListIndex properties to access items in a DriveListBox, DirListBox, or FileListBox control. In addition, the FileListBox has a MultiSelect property which may be set to allow multiple file selection.
Sample Program Overview
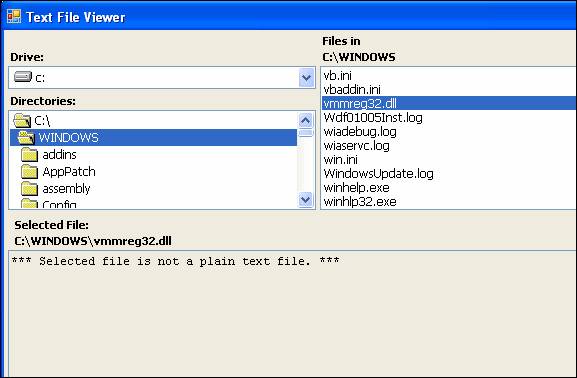
The sample program is a "Text File Viewer". The sample program uses the DriveListBox, DirListBox, and FileListBox to allow the user to navigate his or her file system. When the user selects a file that the program deems to be a "plain text" file, and that file is not "too large", the contents of that file is displayed in a multi-line, scrollable textbox.
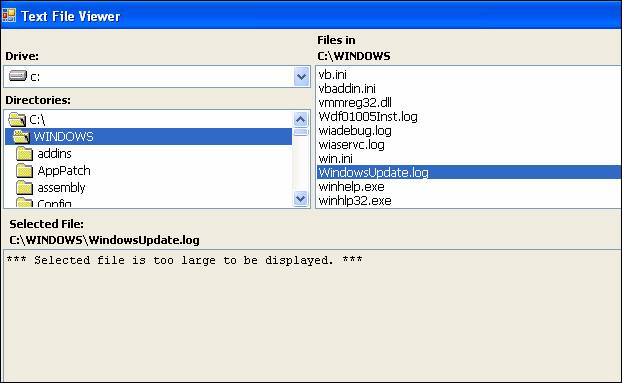
In the screen-shot below, the user has navigated to the directory "C:\VB2010 Prohects – Backup\06-01c-ReadCommaDelim\bin\Debug" and selected the file "employee_comma.txt" from that directory. The content of " employee_comma.txt" is displayed in the multi-line textbox:

The multi-line textbox is limited in capacity to 64 Kbytes (655365 bytes). If the length of the selected file exceeds that amount, the program will not display the selected file; rather, it will display the message "*** Selected file is too large to be displayed. ***" in the textbox:
As mentioned above, the program will only display the contents of what it deems to be "plain text" files. To make the determination, the program scans the bytes of the selected file. If the file contains the ASCII characters 0 through 8, 11 through 12, or 14 through 31, the program will determine that this is NOT a plain text file (this is the standard that is used by the the W3C to validate XML files). If the selected file contains one of these characters, the program will not display the selected file; rather, it will display the message "*** Selected file is not a plain text file. ***" in the textbox:
Sample Program Code
The heavily-commented code for the sample program is shown below.
Imports System.IO
Public Class frmTextFileViewer
' Form-level variable to indicate last valid drive selected ...
Private mstrDrive As String
Private mblnFormLoading As Boolean = False
Private Sub frmTextFileViewer_Load(ByVal sender As System.Object, ByVal e As System.EventArgs) Handles MyBase.Load
mblnFormLoading = True
' Initialize the DriveListBox to point to the C: drive ...
drvSelDrive.Drive = "C:"
' Likewise for the "mstrDrive" variable ...
mstrDrive = "C:"
' Set the path of the DirListBox to point to the root of C:
dirSelDir.Path = "C:\"
dirSelDir.SelectedIndex = -1
dirSelDir.SelectedIndex = 0
End Sub
Private Sub drvSelDrive_SelectedIndexChanged(ByVal sender As System.Object, ByVal e As System.EventArgs) Handles drvSelDrive.SelectedIndexChanged
' An error would occur if you attempted to change to a CD or floppy drive
' where the media was not ready ...
On Error Resume Next
' When the drive changes, set the Path of the DirListBox to point to the
' the newly selected drive ...
dirSelDir.Path = drvSelDrive.Drive
If Err.Number <> 0 Then
' There was a problem with the drive - most likely a CD or floppy drive was
' selected, but there was no CD or disk in the drive.
' Inform the user ...
MsgBox("Drive selected is unavailable.", vbInformation, "Drive Unavailable")
' Reset the Drive property of the DriveListBox to the last valid drive ...
drvSelDrive.Drive = mstrDrive
Else
' Drive change was OK, update the "mstrDrive" variable with the newly
' selected drive ...
mstrDrive = drvSelDrive.Drive
End If
End Sub
Private Sub dirSelDir_Click(ByVal sender As Object, ByVal e As System.EventArgs) Handles dirSelDir.Click
' Coding the Click event for the DirListBox with the code below will force
' the SelectedIndexChanged event (by setting the Path property to the value of
' DirList(DirListIndex) property of the DirListBox (basically the full path of
' currently clicked item is returned). Without doing this, the SelectedIndexChanged
' event would only occur when user DOUBLE-CLICKS a new directory in the DirListBox.
' Invoking the Change on a single-click seems more natural.
With dirSelDir
.Path = .DirList(.DirListIndex)
End With
End Sub
Private Sub dirSelDir_SelectedIndexChanged(ByVal sender As System.Object, ByVal e As System.EventArgs) Handles dirSelDir.SelectedIndexChanged
If Not mblnFormLoading Then Exit Sub
If dirSelDir.SelectedIndex = -1 Then Exit Sub
' The path of the DirListBox has changed, so set the path of the FileListBox
' to point to the new path of the DirListBox. This action alone will cause the
' contents FileListBox to refresh.
filTextFileViewer.Path = dirSelDir.Path
' Update the label caption to reflect the new directory path ...
lblCurrentDir.Text = dirSelDir.Path
lblCurrentDir.Refresh()
' Test the ListCount property of the FileListBox to see if there are any files
' in the current path ...
If filTextFileViewer.Items.Count > 0 Then
' There is at least one file in the current path, so highlight (select) the
' first file by setting ListIndex to 0. This will invoke the filTextFileViewer_Click
' event ...
filTextFileViewer.SelectedIndex = 0
Else
' There are no files in the current path ...
lblSelectedFileName.Text = "(None)"
txtFileContent.Text = ""
End If
End Sub
Private Sub filTextFileViewer_SelectedIndexChanged(ByVal sender As System.Object, ByVal e As System.EventArgs) _
Handles filTextFileViewer.SelectedIndexChanged
Dim strCurrFile As String
Dim strFileContent As String
Dim intFileLen As Integer
Dim intX As Integer
Dim blnIsTextFile As Boolean
If Not mblnFormLoading Then Exit Sub
' If no files are selected from the FileListBox (SelectedIndex = -1),
' then get out because there's nothing to do ...
If filTextFileViewer.SelectedIndex = -1 Then Exit Sub
' Form a fully-qualified file name by concatenating the Path property
' of the FileListBox with the text of the currently selected entry (which
' is the filename). If the path already has a backslash at the end of it
' (as it would for a root directory), fine, otherwise add a backslash to the
' end of it before concatenating it with the filename ...
With filTextFileViewer
strCurrFile = IIf(Strings.Right(.Path, 1) = "\", .Path, .Path & "\") _
& .SelectedItem.ToString
End With
' Update the label caption to reflect the new filename ...
lblSelectedFileName.Text = strCurrFile
' Use the FileLen function to get the length of the current file ...
intFileLen = FileLen(strCurrFile)
' Test the file length ...
If intFileLen >= 65536 Then
' Too big for the textbox, so just display the message ...
txtFileContent.Text = "*** Selected file is too large to be displayed. ***"
Else
' Read the entire contents of the file into a string variable ("strFileContent") ...
Dim objFS As New FileStream(strCurrFile, FileMode.Open, FileAccess.Read)
Dim objSR As New StreamReader(objFS)
strFileContent = objSR.ReadToEnd
objSR.Close()
' Loop thru the file content byte-by-byte to test for characters that would
' "disqualify" the file from being regarded as a "plain-text" file. For our
' purposes, the ASCII characters 0 thru 8, 11 thru 12, and 14 thru 31 would
' disqualify the file.
blnIsTextFile = True
For intX = 1 To intFileLen
If Mid(strFileContent, intX, 1) <> "" Then
Select Case Asc(Mid(strFileContent, intX, 1))
Case 0 To 8, 11 To 12, 14 To 31
blnIsTextFile = False
Exit For
End Select
End If
Next
' Done with the loop, so test the result ...
If blnIsTextFile Then
' All characters were valid, so assign the contents of the file to the
' Text property of the textbox ...
txtFileContent.Text = strFileContent
Else
' We encountered a disqualifying character, so dispaly a message rather
' than the contents of the file ...
txtFileContent.Text = "*** Selected file is not a plain text file. ***"
End If
End If
End Sub
End Class
Download the VB project code for the example above here.