Exploring the VB 2010 IDE (Integrated Development Environment)
We are now going to explore the IDE (Integrated Development Environment) and create a sample “Hello World” project along the way.
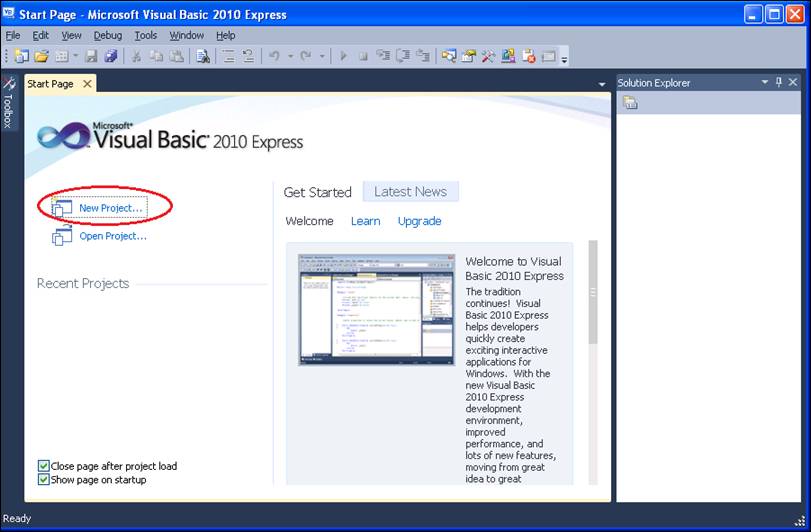
To create a new project, click the New Project link off of the VB 2010 Express Start Page, as shown circled below:
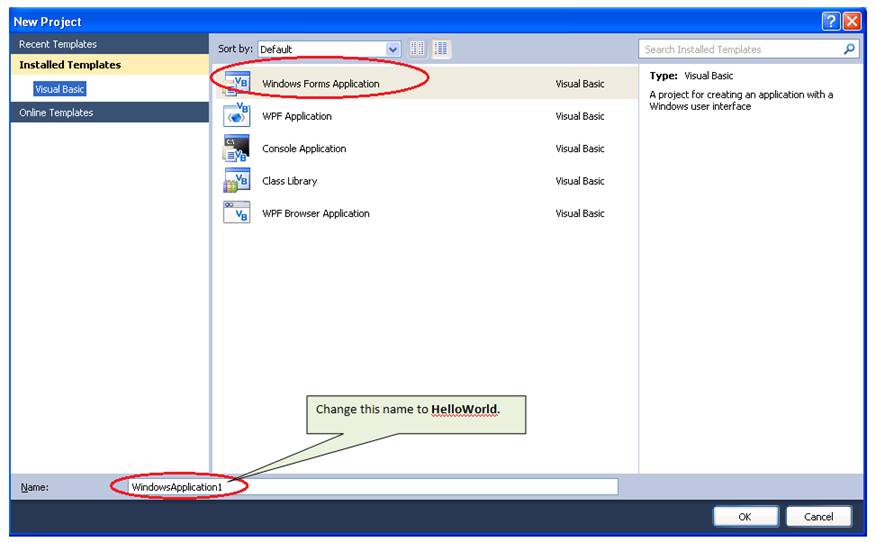
The New Project dialog will then appear, showing a number of different project types. In the tutorials and articles that follow, we will be concerned with two project types: Windows Forms Application (shown circled below) and Console Application.
Our “Hello World” sample program will be a Windows Forms Application. Note that when you select this project type, the default name “WindowsApplication1” is offered at the bottom of the screen. Please change this name to HelloWorld and click OK.
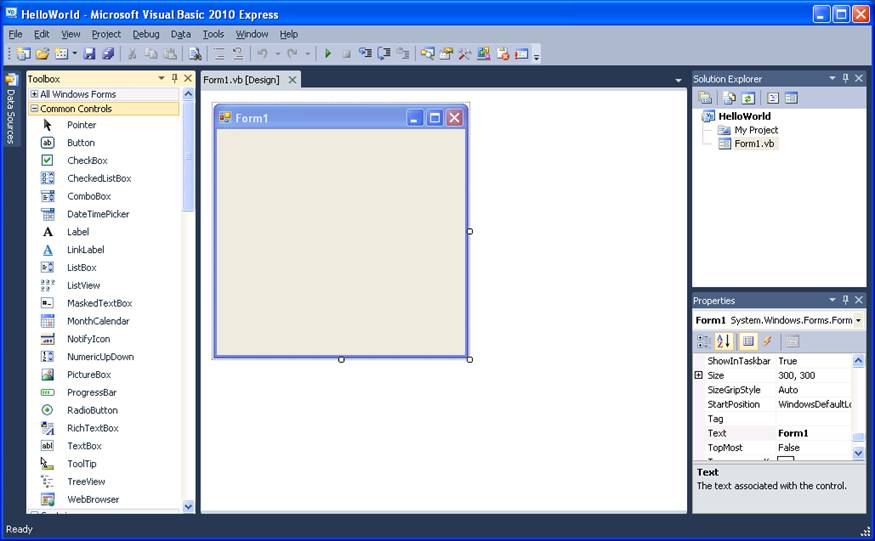
Once you click "OK" on the New Project dialog box, the IDE will look something like the screen-shot shown below. You'll notice that the IDE contains a main menu bar and several windows. A number of items are shown circled below; a brief discussion of these items follows.
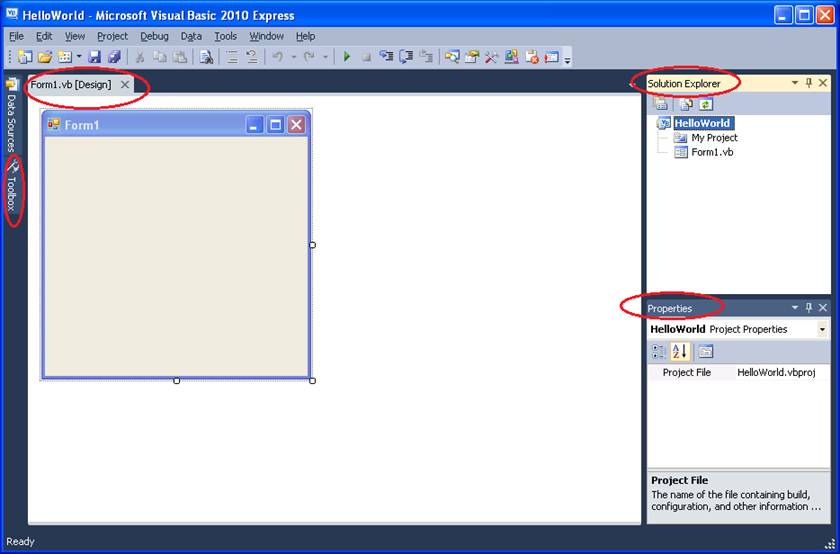
Solution Explorer
On the upper right-hand side, we have the Solution Explorer, which is the file management interface within VB 2010. The Solution Explorer window displays all objects inside the current solution such as Forms, Classes, Modules, Custom Controls and all other embedded resources.
Properties
On the lower right-hand side, we have the Properties window. The VB 2010 IDE allows you to use different items like solutions, projects, classes, forms, modules, and controls, all of which possess different attributes or properties. These properties can be either changed in design time or at runtime. To change these properties at design time, the Properties window is used.
Forms Designer
In a “Windows Form Application” project, the form is the heart of your application; it is the "screen" or "window" that your users will interact with. You can think of the form as a "canvas" on which you will place the various objects that make up your application. When you start a new Windows Form project, VB 2010 automatically supplies you with one form to work with (named “Form1.vb” by default); more forms can be added as needed. VB 2010 also automatically opens that form in design mode for you, in the main portion of the IDE.
The main portion of the IDE consists of one or more tabs where you normally do one of two things: design your forms or write your code. The title of each tab indicates which file of the solution you are working on. If the file name is followed by “[Design]”, then you are in form design mode. So in the screen shot above, we see one tab labeled “Form1.vb [Design]”, and within this tab we have a blank form ready for us to build on.
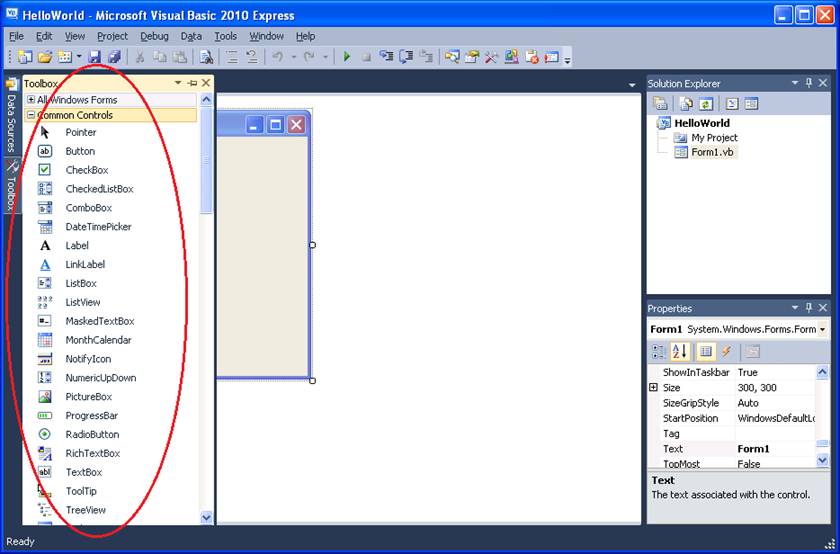
Toolbox
By default, the Toolbox itself is not displayed in the IDE; only the button for it is shown on the left-hand side of the screen. Clicking on the Toolbox button displays the Toolbox, shown below. The toolbox consists of the various objects that you will use to design your application. These objects, called controls, are objects that you see in all standard Windows applications, such as textboxes, command buttons, radio buttons, checkboxes, etc.
|
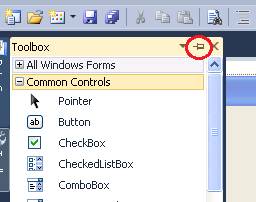
When working on Windows Form applications, a preference of mine is to have the Toolbox “pinned” to the left so that is always showing (I believe it is inconvenient to have to “pop” it open all the time). To pin the Toolbar to the left, click the “pushpin” icon on the Toolbox’s title bar (shown circled here):
|
|
Now the Toolbox is pinned on the left-hand side of the IDE, and will remain so when you open VB 2010 subsequently.
At this point we will explore some properties of forms and controls, investigate some of the ways the IDE can help us work with these, and then proceed to build the Hello World sample program.
Objects in your VB.NET project are automatically given a "numeric name" (like "Form1", "Form2", etc.). It is good programming practice to rename these objects to something more meaningful.
|
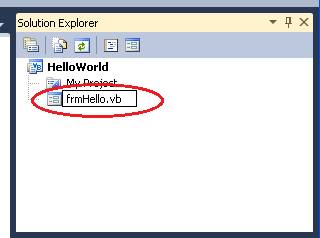
Forms have a name both in the Windows file system as well as an internal name used in your VB program code. Although these names can be different, it is good practice to keep them consistent. When renaming a form, it is best to start with the Solution Explorer, which contains a list of the files that make up your project. To rename a form, right-click on the form and select Rename from the context menu: |
|
|
After selecting Rename, the filename will become editable. Change the form name to frmHello.vb by typing over “Form1.vb”, and then press Enter:
|
|

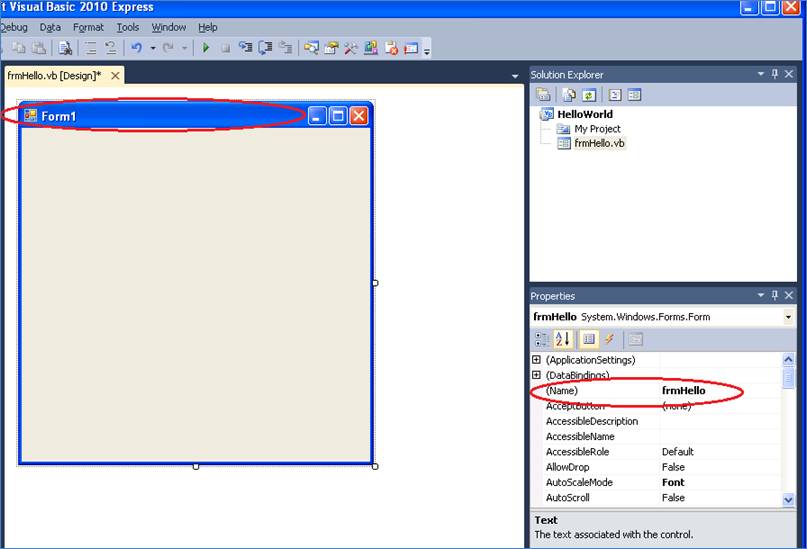
Click on the form’s title bar to make it the active window, then locate the (Name) property in the Properties window (see the screen shot below). Note that the form’s name (the internal name used in the program code) has automatically been changed to “frmHello”, based on the filename change you made in the Solution Explorer. As mentioned above, it is best to keep these names consistent.
|
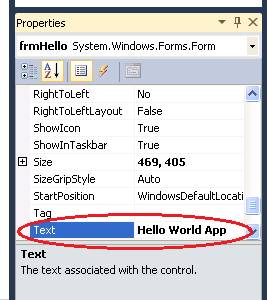
Still in the Properties window, change the Text property to Hello World App: |
|
|
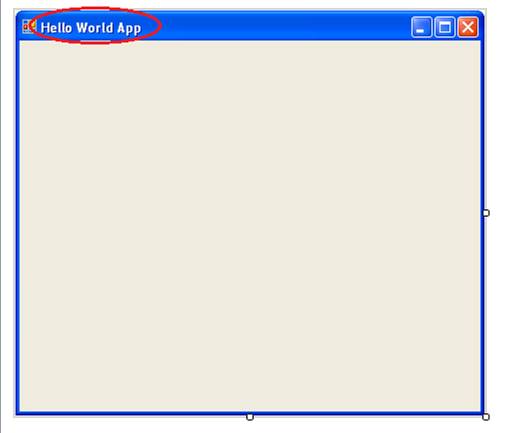
Note that the Text property of a form affects the text that appears in the form’s title bar: |
|
Placing Controls on Forms
There are two basic ways to place a control on a form:
|
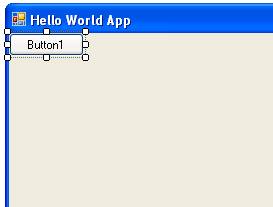
The first way is to double-click the desired control in the toolbox (a command button was used in the example). The control is automatically placed in the top left corner of the form, as shown on the right.
You can then move and resize the control on the form as desired with your mouse.
|
|
|
The second way is to click the desired control in the toolbox once. The mouse cursor becomes a "crosshair" when you move your mouse over the form, and you can draw the control on the form "manually".
|
|
|
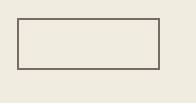
As you hold the mouse button down, you will see the outline of the control you are drawing: |
|
|
When you release the mouse button, the control appears: |
|

Selecting Multiple Controls
Often, it is convenient to select more than one control at the same time. This enables you to apply the same action to the selected controls (such as moving, formatting, and deleting) simultaneously, which can save time. There are two ways to select multiple controls:
|
The first way to select multiple controls is to click on one control with your mouse. Then, hold the Ctrl key down on the keyboard, and click the other controls that you want to select.
|
|
|
The second way to select multiple controls is to "lasso" the desired controls with your mouse. Hold the mouse button down, and "sweep" the mouse over the controls you want to select. As you do this, a thin dotted line will appear around the controls, as seen in the screen shot on the right. When you release the mouse, the controls should be selected. |
|
Note: To de-select a control in a group of selected controls, Ctrl-click the control that you want to exclude. To de-select all controls that you have selected, click in a blank area of the form.
Formatting Multiple Controls
Often, the controls on your form will be "grouped" logically. You may have a set of textboxes in one area, a set of option (radio) buttons in another area, a set of command buttons at the bottom, etc. To create professional-looking forms, these controls should be "lined up" and spaced properly. The options on the Format menu can help you achieve this with relative ease. A number of examples follow.
|
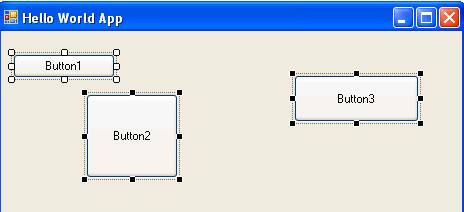
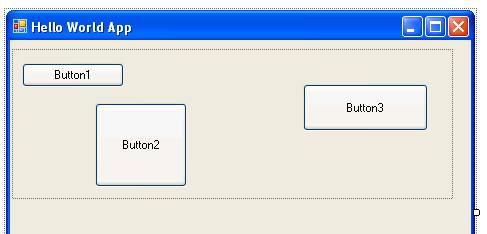
In the previous example, we had three buttons on the form, each a different size and placed haphazardly on the form: |
|
|
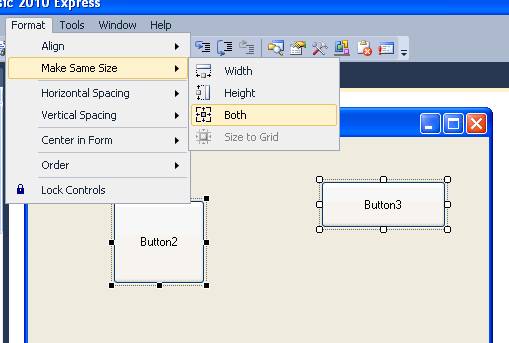
We can make them all the same size by using Format à Make Same Size à Both: |
|
|
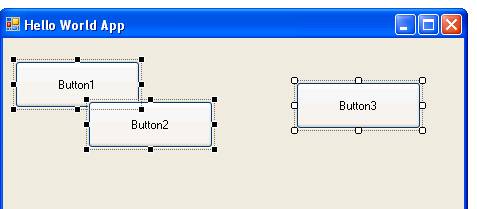
After the command, note that all three buttons are the same size. “Button3” is the control that was used as the guide. Note that it has white selection handles, compared to the others that have black. When a group of controls is selected, the first one selected will have white selection handles, and is the one that will be used as a guide when formatting multiple controls. |
|
|
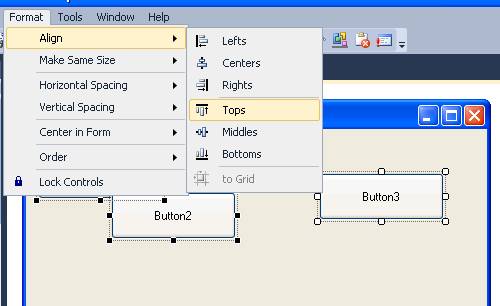
We can line the buttons up by using Format à Align à Tops: |
|
|
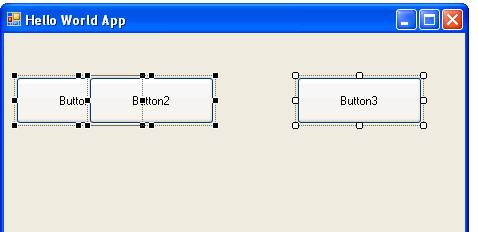
So now the buttons are lined up. But as you can see, Button2 is overlapping Button1. You could of course rearrange these manually with the mouse, but when you have three or more controls selected, you have some other options (see the next example below). |
|
|
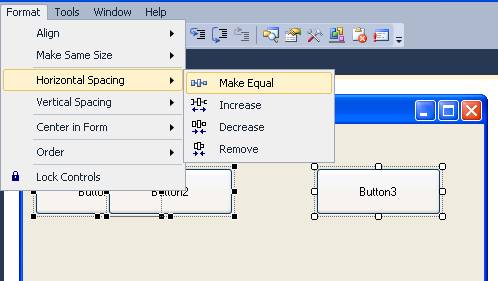
When three or more controls are selected, you can ensure that the same amount of “white space” exists between all the controls in the selected group by using Format à Horizontal Spacing à Make Equal: |
|
|
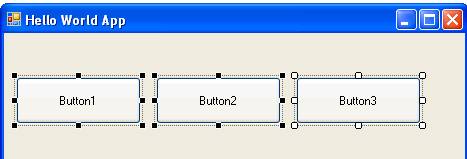
So now there is an equal amount of white space between the buttons: |
|
|
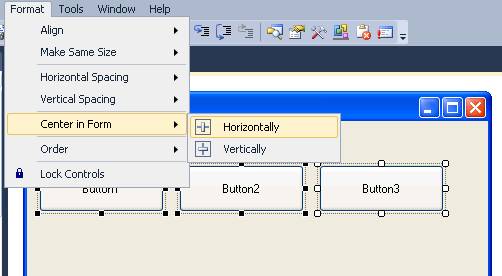
In one last example, we will now center the buttons horizontally on the form. This can be accomplished using Format à Center in Form à Horizontally: |
|
|
Note that the buttons are now centered horizontally (the left and right margins are equal). |
|