The Common Dialog Control
The Common Dialog control provides a standard set of dialog boxes for operations such as opening, saving, and printing files, as well as selecting colors and fonts and displaying help. Any six of the different dialog boxes can be displayed with just one Common Dialog control. A particular dialog box is displayed by using one of the six "Show..." methods of the Common Dialog control: ShowOpen, ShowSave, ShowPrinter, ShowColor, ShowFont, or ShowHelp.
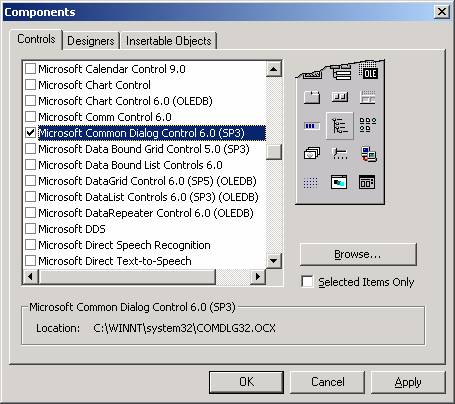
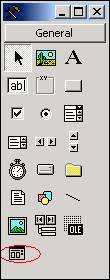
The Common Dialog control not an intrinsic control; rather, it is an "Active X" control that must be added to the toolbox via the Components dialog box, as shown below. This dialog box is accessed via the Project menu, Components item. Once you check "Microsoft Common Dialog Control 6.0" and click OK, the control is added to your toolbox (also shown below, circled). Then you can double-click it to make it appear on your form, as you would with any other control. The Common Dialog control is not visible at run-time.
|
The Components Dialog Box |
Common Dialog Control Added to Toolbox |
|
|
|
Certain functionality for the dialog boxes is provided automatically by VB and Windows, but other functionality must be coded. For example, with the Open and Save dialog boxes, the functionality to navigate to different drives and directories is built in, but the functionality to actually save or open a file must be coded in your program.
The sample program for this topic will be presented shortly, but first, two properties of the Common Dialog control, Flags and CancelError, will be discussed briefly.
The Flags Property
The appearance and behavior of the dialog boxes can be modified to some degree with the Flags property of the Common Dialog control. Wherever possible, you should use the Flags property to control the appearance of the dialog box in question such that you only present features to the user that your application supports. Examples follow.
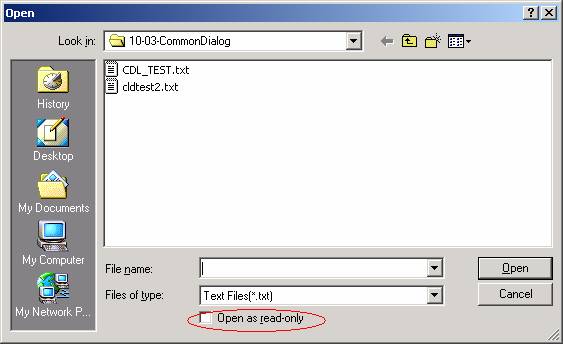
(1) Shown below is a screen shot of the Open Common Dialog Box. Note that the item "Open as read only" is circled. You can use the Flags property to suppress this item (you should only show it if your application will let the user decide whether or not to open the file as read-only).
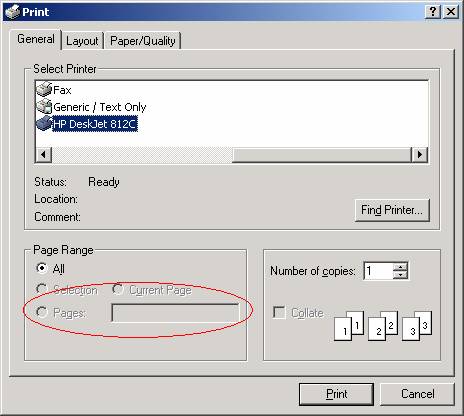
(2) Shown below is a screen shot of the Print Common Dialog Box. Note that the circled items in the "Page Range" area (for printing a selection or a specific page range) are grayed out. These items were disabled via Flags property settings. You should only enable such options if your program contains the logic to act on them.
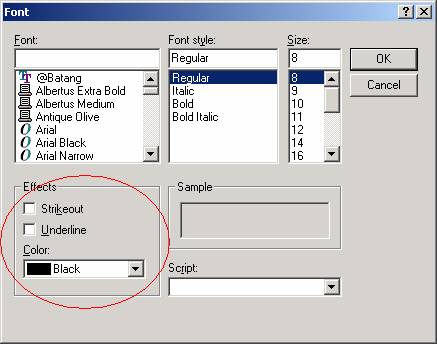
(3) Shown below is a screen shot of the Font Common Dialog Box. The Flags property can control whether or not the "Effects" area (circled) is displayed.
The CancelError Property
In order to test whether or not the user clicked the Cancel button on a Common Dialog box, you must set up special error-handling logic. If you don't, VB will treat the clicking of the Cancel button as an unhandled error and will thus cause your program to end abruptly (this will not exactly endear you to your users).
You can test to see whether or not the user clicked the Cancel button by setting the CancelError property to True – this causes an error routine you have written (using the "On Error Goto label technique) to be executed when the user clicks Cancel.
The basic structure of a VB procedure that displays a Common Dialog box should be as follows:
Private Sub WHATEVER()
DECLARE LOCAL VARIABLES
ON ERROR GOTO CANCELERROR_ROUTINE
SET CancelError PROPERTY TO TRUE (e.g., CommonDialog1.CancelError = True)
SET Flags AND OTHER PROPERTIES TO APPROPRIATE VALUES
SHOW THE COMMON DIALOG (e.g., CommonDialog1.ShowSave)
' When you show the common dialog box, processing is suspending until the
' user performs an action. If they click the Cancel button, VB will jump
' to the error-handling routine you set up (i.e., CANCELERROR_ROUTINE).
' Assuming the user did not click Cancel, continue processing below ...
' Now that the dialog box is done being shown, we can put a "normal" error-
' handling routine in place, if desired ...
On Error GoTo NORMAL_ERROR_ROUTINE
NORMAL PROCESSING HERE
' Exit here so that you don't fall through to the error-handling logic
Exit Sub
NORMAL_ERROR_ROUTINE:
MsgBox "Err # " & Err.Number & " - " & Err.Description, vbCritical, "Error"
Exit Sub
CANCELERROR_ROUTINE:
' Do nothing, no problem if user clicks Cancel button ...
End Sub
COMMON DIALOG DEMO PROGRAM
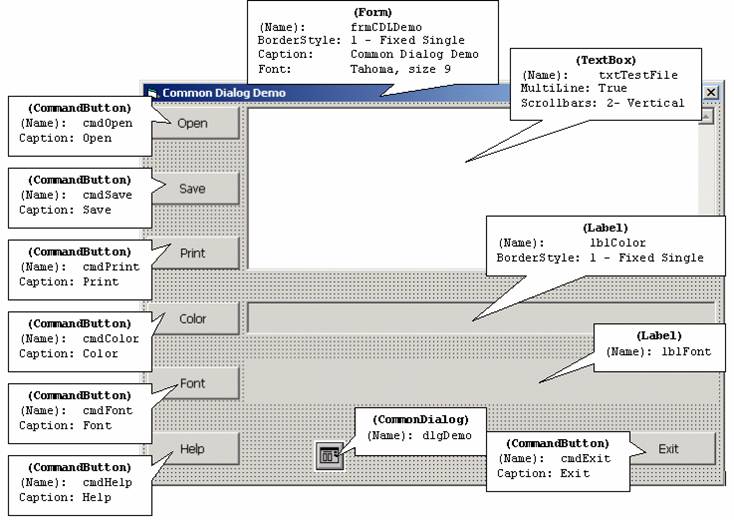
The Common Dialog demo program shows how to use each of the six types of dialog boxes. The design-time form is shown below, with the names and property settings for each control on the form, as well as for the form itself, shown in callouts.
The coding for the demo program is provided below, with explanations.
The General Declarations Section
In the General Declarations section, a form-level String variable, mstrLastDir, is declared. This variable is used to store the directory of the last file accessed by an Open or Save operation, so it can be subsequently used as the default directory for the next Open or Save operation.
Option Explicit
Private mstrLastDir As String
The Form_Load Event
In the Form_Load event, the variable mstrLastDir is initialized to path where the program is running; this will serve as the default directory the first time that an Open or Save operation is performed.
Private Sub Form_Load()
mstrLastDir = App.Path
End Sub
The cmdOpen_Click Event
This event fires when the user clicks the Open button. The procedure follows the structure described above in the section discussed the CancelError property. Local variables are declared, an On Error statement is set up as part of the Cancel error handler, and then various properties of the Common Dialog box (dlgDemo) are set.
As discussed above, setting the CancelError property to True enables us to handle the run-time error that will occur if the user clicks the dialog's Cancel button.
The InitDir property tells the Common Dialog control where to start its navigation of the file system. As discussed above, we are using the form-level variable mstrLastDir to value this property.
The Flags property, as discussed earlier, is used to modify the appearance and/or behavior of the dialog boxes. The Flags property is set by assigning one or more predefined VB constants (all beginning with the letters "cdl") to it. If more than one flag is to be assigned to the Flags property, you do so by adding the constants together:
CommonDialog1.Flags = cdlThisFlag + cdlThatFlag + cdlTheOtherFlag
Multiple flags can also be assigned by joining them together with the logical Or operator:
CommonDialog1.Flags = cdlThisFlag Or cdlThatFlag Or cdlTheOtherFlag
In this case, we are assigning one flag to the Flags property, cdlOFNHideReadOnly, which tells the Common Dialog control to suppress the "Open as read only" checkbox.
The FileName property is initially set to "" so that a filename is not pre-selected when the dialog box is displayed (if we wanted to, we could initialize it with a default filename). After the Common Dialog has been shown and the user has interacted with it, we use the FileName property to determine what file the user has selected.
The Filter property is a pipe-delimited string specifying what types of files should be shown in the file list portion of the Common Dialog box. The Filter string specifies a list of file filters that are displayed in the Files of type drop-down box. The Filter property string has the following format:
description1 | filter1 | description2 | filter2...
Description is the string displayed in the list box — for example, "Text Files (*.txt)." Filter is the actual file filter — for example, "*.txt." Each description | filter set must be separated by a pipe symbol (|).
The ShowOpen method displays the Open Common Dialog box. At this point, processing will pause until the user either selects a file to open and clicks OK, or clicks Cancel. If the user clicks Cancel, the process will branch to the cmdOpen_Click_Exit label and the procedure will end. If the user selects a file and clicks OK, processing will continue with the statement following the execution of the ShowOpen method.
Assuming the user selects a file and clicks OK, the FileName property, which now contains the full path and filename of the file that the user selected, is assigned to the local variable strFileToOpen. The remaining code actually opens the file and loads into the mutli-line textbox (the code uses techniques discussed in previous topics). The statement prior to Exit Sub resets the mstrLastDir variable to reflect the path of the file that the user had selected.
Private Sub cmdOpen_Click()
Dim strBuffer As String
Dim intDemoFileNbr As Integer
Dim strFileToOpen As String
On Error GoTo cmdOpen_Click_Exit
With dlgDemo
.CancelError = True
.InitDir = mstrLastDir
.Flags = cdlOFNHideReadOnly
.FileName = ""
.Filter = "Text Files(*.txt)|*.txt|All Files(*.*)|*.*"
.ShowOpen
strFileToOpen = .FileName
End With
On Error GoTo cmdOpen_Click_Error
intDemoFileNbr = FreeFile
Open strFileToOpen For Binary Access Read As #intDemoFileNbr
strBuffer = Input(LOF(intDemoFileNbr), intDemoFileNbr)
txtTestFile.Text = strBuffer
Close #intDemoFileNbr
mstrLastDir = Left$(strFileToOpen, InStrRev(strFileToOpen, "\") - 1)
Exit Sub
cmdOpen_Click_Error:
MsgBox "The following error has occurred:" & vbNewLine _
& "Err # " & Err.Number & " - " & Err.Description, _
vbCritical, _
"Open Error"
cmdOpen_Click_Exit:
End Sub
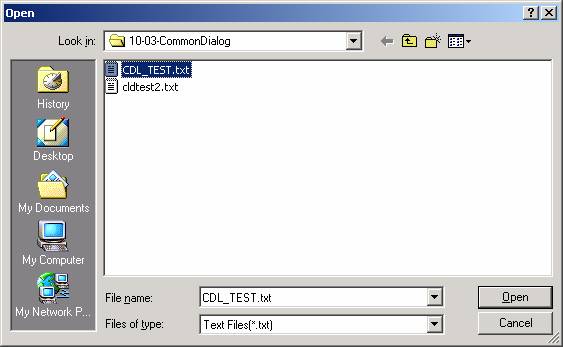
Screen shot of the Open Common Dialog box:
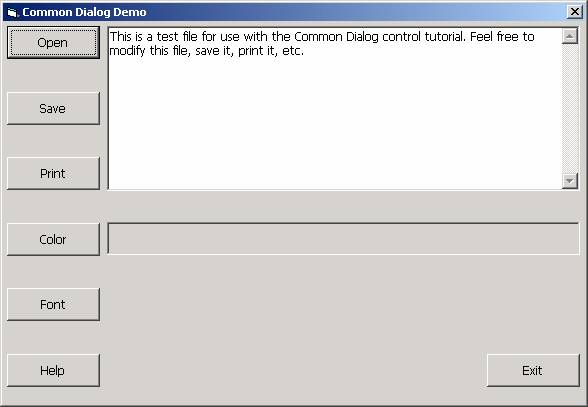
Screen shot of the main form after the user has opened the "CDL_TEST.txt" File:
The cmdSave_Click Event
This event fires when the user clicks the Save button. In this demo application, the contents of the multi-line textbox will be saved to filename specified. The code for this event procedure is very similar to that of the cmdOpen_Click event, with the obvious differences that the ShowSave method of the Common Dialog control is invoked, and that we are writing out a file rather than reading one in.
We are assigning two flags to the Flags property, cdlOFNOverwritePrompt (which will cause the Common Dialog control to automatically prompt the user for confirmation if they attempt to save a file that already exists) and cdlOFNPathMustExist (which specifies that the user can enter only valid paths - if this flag is set and the user enters an invalid path, a warning message is displayed).
Private Sub cmdSave_Click()
Dim strBuffer As String
Dim intDemoFileNbr As Integer
Dim strFileToSave As String
On Error GoTo cmdSave_Click_Exit
With dlgDemo
.CancelError = True
.InitDir = mstrLastDir
.Flags = cdlOFNOverwritePrompt + cdlOFNPathMustExist
.FileName = ""
.Filter = "Text Files(*.txt)|*.txt|All Files(*.*)|*.*"
.ShowSave
strFileToSave = .FileName
End With
On Error GoTo cmdSave_Click_Error
intDemoFileNbr = FreeFile
Open strFileToSave For Binary Access Write As #intDemoFileNbr
strBuffer = txtTestFile.Text
Put #intDemoFileNbr, , strBuffer
Close #intDemoFileNbr
mstrLastDir = Left$(strFileToSave, InStrRev(strFileToSave, "\") - 1)
Exit Sub
cmdSave_Click_Error:
MsgBox "The following error has occurred:" & vbNewLine _
& "Err # " & Err.Number & " - " & Err.Description, _
vbCritical, _
"Save Error"
cmdSave_Click_Exit:
End Sub
The cmdPrint_Click Event
This event fires when the user clicks the Print button. In this demo application, this will cause the contents of the multi-line textbox to be printed to the printer specified.
We are assigning three flags to the Flags property, cdlPDHidePrintToFile (which suppresses the display of the "Print to file" checkbox), cdlPDNoPageNums (which grays out the "Pages" option of the "Page Range" area) and cdlPDNoSelection (which grays out the "Selection" option of the "Page Range" area).
Note that after the ShowPrinter method is executed, we are saving the value of the Copies property, as our program must implement the logic to print multiple copies if the user has selected more than one copy on the "Number of copies" spinner of the Printer Common Dialog box. Following that, various methods and properties of the Printer object are employed to carry out the task of printing the textbox contents.
Private Sub cmdPrint_Click()
Dim intX As Integer
Dim intCopies As Integer
On Error GoTo cmdPrint_Click_Exit
With dlgDemo
.CancelError = True
.Flags = cdlPDHidePrintToFile + cdlPDNoPageNums _
+ cdlPDNoSelection
.ShowPrinter
intCopies = .Copies
End With
On Error GoTo cmdPrint_Click_Error
For intX = 0 To Printer.FontCount - 1
If Printer.Fonts(intX) Like "Courier*" Then
Printer.FontName = Printer.Fonts(intX)
Exit For
End If
Next
Printer.FontSize = 10
For intX = 1 To intCopies
If intX > 1 Then
Printer.NewPage
End If
Printer.Print txtTestFile.Text
Next
Printer.EndDoc
Exit Sub
cmdPrint_Click_Error:
MsgBox "The following error has occurred:" & vbNewLine _
& "Err # " & Err.Number & " - " & Err.Description, _
vbCritical, _
"Print Error"
cmdPrint_Click_Exit:
End Sub
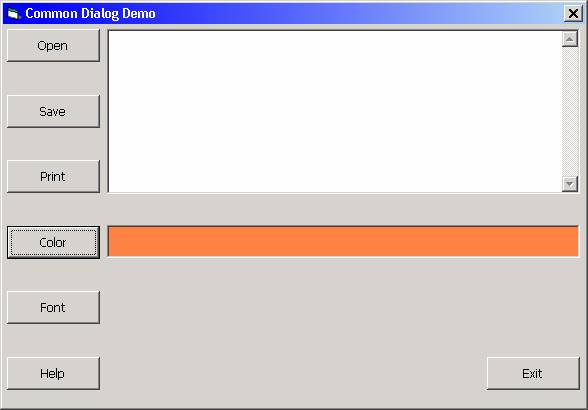
The cmdColor_Click Event
This event fires when the user clicks the Color button. In this demo application, this will cause the BackColor property of the Label lblColor to change to the selected color. In this example, no flags are set for the Color Common Dialog box. After the ShowColor method has been executed, the selected color is retrieved from the Common Dialog control's Color property.
Private Sub cmdColor_Click()
Dim lngColor As Long
On Error GoTo cmdColor_Click_Exit
With dlgDemo
.CancelError = True
.ShowColor
lngColor = .Color
End With
On Error GoTo cmdColor_Click_Error
lblColor.BackColor = lngColor
Exit Sub
cmdColor_Click_Error:
MsgBox "The following error has occurred:" & vbNewLine _
& "Err # " & Err.Number & " - " & Err.Description, _
vbCritical, _
"Color Error"
cmdColor_Click_Exit:
End Sub
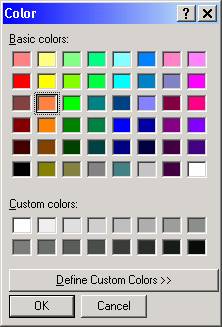
Screen shot of the Color Common Dialog box:
Screen shot of the main form after the user has selected the orange color:
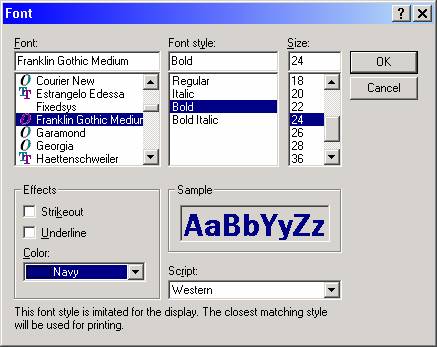
The cmdFont_Click Event
This event fires when the user clicks the Font button. In this demo application, this will cause the font-related attributes selected in the Font Common Dialog box to be assigned to the corresponding properties of the Label lblFont.
We are assigning three flags to the Flags property, cdlCFBoth (which Causes the dialog box to list the available printer and screen fonts), cdlCFForceFontExist (which specifies that an error message box is displayed if the user attempts to select a font or style that doesn't exist) and cdlCFEffects (which specifies that the dialog box enables strikethrough, underline, and color effects).
Private Sub cmdFont_Click()
Dim lngFont As Long
On Error GoTo cmdFont_Click_Exit
With dlgDemo
.CancelError = True
.Flags = cdlCFBoth + cdlCFForceFontExist + cdlCFEffects
.ShowFont
On Error GoTo cmdFont_Click_Error
lblFont.FontBold = .FontBold
lblFont.FontItalic = .FontItalic
lblFont.FontName = .FontName
lblFont.FontSize = .FontSize
lblFont.FontStrikethru = .FontStrikethru
lblFont.FontUnderline = .FontUnderline
lblFont.ForeColor = .Color
lblFont.Caption = .FontName & ", " & .FontSize & " pt"
End With
Exit Sub
cmdFont_Click_Error:
MsgBox "The following error has occurred:" & vbNewLine _
& "Err # " & Err.Number & " - " & Err.Description, _
vbCritical, _
"Font Error"
cmdFont_Click_Exit:
End Sub
Screen shot of the Font Common Dialog box:
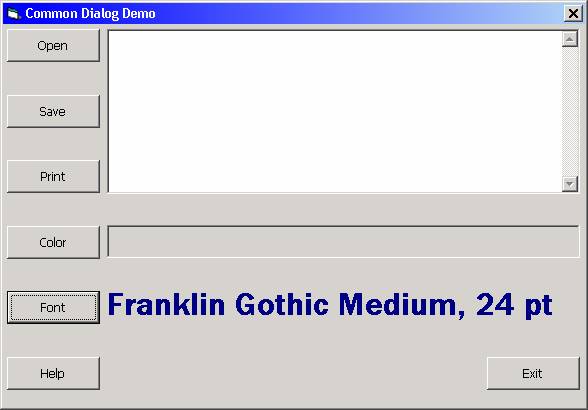
Screen shot of the main form after the user has selected the Franklin Gothic Medium font (Bold, Size 24, in Navy color):
The cmdHelp_Click Event
This event fires when the user clicks the Help button. In this event, the ShowHelp method of the Common Dialog control is invoked. Unlike the other five "Show" methods, ShowHelp does not display a dialog box per se, but rather it invokes the Windows Help Engine (Winhlp32.exe) to display a help file. ShowHelp can only display help files that are in "classic" WinHelp format (these files normally have the .hlp extension) – the ShowHelp method CANNOT display an HTML-format help file (files that normally have the extension .chm).
In order for the Help file to be displayed, the HelpCommand and HelpFile properties of the Common Dialog control must be set to appropriate values. In the demo program, the HelpCommand property is set to cdlHelpForceFile (which ensures WinHelp displays the correct help file), and the HelpFile property is set to the MS-Jet SQL Help file (JETSQL35.HLP).
Private Sub cmdHelp_Click()
On Error GoTo cmdHelp_Click_Error
With dlgDemo
.CancelError = True
.HelpCommand = cdlHelpForceFile
.HelpFile = App.Path & "\JETSQL35.HLP"
.ShowHelp
End With
Exit Sub
cmdHelp_Click_Error:
End Sub
Screen shot of the Help File displayed by the demo program when ShowHelp is invoked:

Download the project files for this topic here.