ListBoxes
ListBoxes provide two property arrays into which you can place data: List and ItemData. Whenever you reference these properties of the ListBox control, you must do so with an index reference, i.e.:
List1.List(X) or List1.ItemData(X)
The List array is a zero-based array of STRING items and is what the user sees in the ListBox. The ItemData array is an array of LONG INTEGER items in which you can OPTIONALLY place a numeric data item associated with the corresponding string item. If ItemData is used, each element is always associated with the corresponding element of the List array; it is not an independent array.
You cannot tell VB ahead of time how many items will be placed in the ListBox. The number of elements in the ListBox is maintained by VB via the ListCount property (a read-only property of ListBoxes), which is dependent on the use of the AddItem method to get items into the ListBox and the RemoveItem method to get items out of the ListBox.
Getting Data into a ListBox
The AddItem Method
To get data into the ListBox, you use the AddItem method. The syntax is:
ListboxName.AddItem string
This syntax places the string item into an element of the List property array. It does not affect the ItemData property array; the AddItem method is not used to place data in the ItemData array. The technique to place an item into the corresponding element of the ItemData array will be shown a little further below. Remember that the use of the ItemData array is optional, and if your application does not need to have numeric items associated with the string items in the ListBox, then you need not use it.
With the AddItem method, the issue of which element of the List array an item is placed in depends on the setting of the Sorted property. You can set the Sorted property of the ListBox control at design time to True or False; by default it is set to False.
When Sorted is False, VB adds items to the ListBox in sequential order. For example, consider the following three statements to add the items "Orange", "Apple", and "Banana" to a ListBox called lstFood:
lstFood.AddItem "Orange"
lstFood.AddItem "Apple"
lstFood.AddItem "Banana"
The data would be stored in the ListBox in the following manner:
|
Array Index # |
List Array Elements |
|
0 |
Orange |
|
1 |
Apple |
|
2 |
Banana |
When Sorted is True, VB automatically adjusts the indexes as items are added to the ListBox so that the elements of the List array are in ascending sequence. Once again, assume you coded the following:
lstFood.AddItem "Orange"
lstFood.AddItem "Apple"
lstFood.AddItem "Banana"
The data would be stored in the ListBox in the following manner:
|
Array Index # |
List Array Elements |
|
0 |
Apple |
|
1 |
Banana |
|
2 |
Orange |
Now suppose we wanted to store the number of calories for each food in the ListBox. You could use the ItemData property of the ListBox to store the number 105 for "Banana", 60 for "Orange", and 80 for "Apple".
To place items in the ItemData property array of the ListBox, you can use the (read-only) NewIndex property of the ListBox control, which represents the index of last item added to the ListBox with the AddItem method. Using the earlier example with the Sorted property set to False, the statement
lstFood.AddItem "Orange"
would cause the NewIndex property to be set to zero (0) – because "Orange" was the first item added to the list, and the indexes start with zero. Therefore, the following statement would place the number 60 in the corresponding element (0) of the ItemData array:
lstFood.ItemData(lstFood.NewIndex) = 60
Expanding the earlier example, suppose we had these statements following the two above:
lstFood.AddItem "Apple"
NewIndex is now 1
lstFood.ItemData(lstFood.NewIndex) = 80
lstFood.AddItem "Banana"
NewIndex is now 2
lstFood.ItemData(lstFood.NewIndex) = 105
The data would be stored in the ListBox in the following manner:
|
Array Index # |
List Array Contents |
ItemData Array Contents |
|
0 |
Orange |
60 |
|
1 |
Apple |
80 |
|
2 |
Banana |
105 |
If the Sorted property were set to True, the sequence of events would be as follows:
lstFood.AddItem "Orange"
NewIndex is now 0
lstFood.ItemData(lstFood.NewIndex) = 60
lstFood.AddItem "Apple"
NewIndex is now 0 – (The "Orange" item (and its ItemData of 60) is moved to index #1)
lstFood.ItemData(lstFood.NewIndex) = 80
lstFood.AddItem "Banana"
NewIndex is now 1 – ("Apple" remains at index #0, and "Orange" is moved to index #2)
lstFood.ItemData(lstFood.NewIndex) = 105
The data would be stored in the ListBox in the following manner:
|
Array Index # |
List Array Contents |
ItemData Array Contents |
|
0 |
Apple |
80 |
|
1 |
Banana |
105 |
|
2 |
Orange |
60 |
Coding Tip:
Note in the statements above the frequent references to the name of the ListBox control, "lstFood". When you use the same object reference (lstFood in this case) in a group of statements, you can enclose those statements in a With/End With block to "factor out" the object name. For example, the six statements in our example could be rewritten as follows:
With lstFood
.AddItem "Orange"
.ItemData(.NewIndex) = 60
.AddItem "Apple"
.ItemData(.NewIndex) = 80
.AddItem "Banana"
.ItemData(.NewIndex) = 105
End With
The AddItem examples we looked at thus far used literal values to load the ListBox. Often, you'll want to load a listbox with data from a file or database table. For example, suppose we had a sequential file called "FOOD.DAT" which contained the following records:
"Orange",60
"Apple",80
"Banana",105
To load this data into the ListBox, you could use the following code:
Dim strFood As String
Dim intCalCount As Integer
Open "FOOD.DAT" For Input As #1
Do Until EOF(1)
Input #1, strFood, intCalCount
With lstFood
.AddItem strFood
.ItemData(.NewIndex) = intCalCount
End With
Loop
Close #1
Placing Items in a ListBox at Design Time
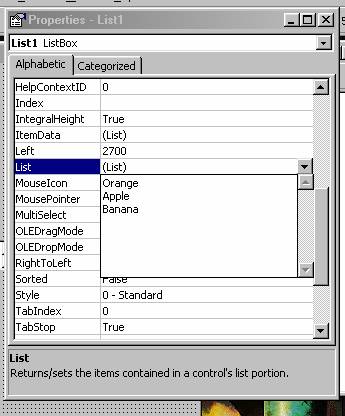
At design time, you can access the property sheet for the ListBox and add items via the List property, as shown in the screen-shot below. To add multiple items to the list, you press Ctrl-Enter to move to the next line in the list (just pressing Enter will close the property). You can also add to the ItemData property in this manner (however, you must specify items for List before specifying items for ItemData). Placing items in the list this way eliminates the need to use the AddItem method. You would typically add items to this list in this manner if the list is to remain static (i.e., the items are not expected to change).
Referencing Data Items Stored in a ListBox
As mentioned in the beginning of this document, you can reference any element of the List property array or ItemData property array (regardless of whether or not that item is selected) with a valid index reference, i.e.:
ListboxName.List(IndexValue)
ListboxName.ItemData(IndexValue)
A valid index reference is an integer between zero and one less than the number of items stored in the ListBox. For example, if there are 5 items in theListBox, a valid index reference is a number between 0 and 4. To determine the number of items stored in the ListBox, you use the ListCount property of the ListBox. For example, the following code prints the contents of the List and ItemData arrays on the background area of the form:
Dim intX As Integer
With lstFood
For intX = 0 To .ListCount – 1
Print .List(intX), .ItemData(intX)
Next
End With
Determining Which Items in a ListBox Are Selected
Typically, you only care about what items in the listbox were selected by the user. The issue of whether or not the user is permitted to select multiple items from the ListBox then comes up. You determine this at design-time by setting the MultiSelect property in the property sheet of the ListBox.
By default, the MultiSelect property is set to "0 – None", meaning that only one item can be selected from the ListBox. If the user selects one item, then clicks a different item, the item previously selected is de-selected. If you want to allow the user to select more than one item from the ListBox, you can set the MultiSelect property to either "1 – Simple", or "2 – Extended". "Simple" allows the user to select more than one item by first clicking an item, then Ctrl-clicking subsequent items. "Extended" does the same thing as "Simple", but also supports selecting a group of contiguous items by allowing the user to click the first item in the group and then Shift-click the last item in the group.
If MultiSelect is set to None:
When you are only allowing the user to select one item from the list, there are two ways to determine which item is selected. One way involves the Text property of the ListBox, the other way involves the ListIndex property of the ListBox. Suppose you have a ListBox and a command button on your form. When the user clicks the command button, you want to process the item that the user has selected from the ListBox. As an example, to store the user's selection in a string variable called strListSel, you could place this code behind the command button:
strListSel = lstFood.Text
The Text property of the ListBox stores the contents of the List array item that is selected.
Alternatively, you can use the ListIndex property to access the contents of the List item that is selected. The ListIndex property is an integer value representing the index of the currently selected item. Therefore, the following statement achieves the same result as the one above:
strListSel = lstFood.List(lstFood.ListIndex)
To access the contents of the ItemData element corresponding to the item in the list that is selected, you must use the ListIndex property. Suppose you wanted to store the ItemData contents corresponding to the user's selection in a long variable called lngCalCount. You could place this code behind the command button:
lngCalCount = lstFood.ItemData(lstFood.ListIndex)
Pre-Selecting an Item in a ListBox:
If you load a ListBox but do not pre-select an item from the list in code, then by default, the value of ListIndex will be 0. When ListBox is first displayed on the form, the first item in the list will show the focus rectangle, but will not be highlighted. To pre-select an item in code (so that the user is presented with a default selection), use the following:
lstFood.ListIndex = 0
The above code highlights and pre-selects the first item in the ListBox. You could set the ListIndex to any other valid index number.
If you wish to NOT pre-select an item from the ListBox (and sometimes this will be the case, because you do not want to default a selection for the user), you can set the ListIndex property to –1. A value of –1 for ListIndex indicates that no item is selected:
lstFood.ListIndex = -1
If you do the above, you must be careful about subsequent references to ListIndex, because if the user never selects an item from the ListBox, ListIndex will remain at –1 and therefore would not refer to a valid element of the List or ItemData arrays, and statements like the ones we looked at earlier would cause a run-time error:
These statements would cause run-time errors if ListIndex = -1:
strListSel = lstFood.List(lstFood.ListIndex)
lngCalCount = lstFood.ItemData(lstFood.ListIndex)
You could avoid this problem by testing ListIndex for a value of -1:
If lstFood.ListIndex <> -1 Then
strListSel = lstFood.List(lstFood.ListIndex)
lngCalCount = lstFood.ItemData(lstFood.ListIndex)
End If
If MultiSelect is set to Simple or Extended:
If the MultiSelect property of the ListBox is set to a "non-None" value (i.e., either "Simple" or "Extended"), you use the Selected property array of the ListBox in a loop to determine the selected items. Like List and ItemData, Selected is a property array of the ListBox. Each element of Selected stores a Boolean value of True or False, indicating whether or not the corresponding List item is selected. In code, the Selected property is referenced as follows:
ListboxName.Selected(IndexValue)
The following code loops through the items in the lstFood ListBox and prints each selected item, along with its ItemData property, on the background area of the form:
Dim intX As Integer
With lstFood
For intX = 0 To .ListCount – 1
If .Selected(intX) Then
Print .List(intX), .ItemData(intX)
End If
Next
End With
Pre-Selecting an Item in a ListBox with the Selected Property:
Previously, you learned that you can pre-select an item in a ListBox with the ListIndex property. An alternative way of pre-selecting an item in a ListBox is to use the Selected property. For example, the following statement pre-selects the first item in the lstFood ListBox:
lstFood.Selected(0) = True
Removing Items from a ListBox
To remove ALL items from a ListBox, you use the Clear method. The syntax is simply:
ListboxName.Clear
More frequently, you'll only want to remove a particular item or items from the ListBox, in which case you use the RemoveItem method. The RemoveItem method requires you to specify the index value of the element you want to remove:
ListboxName.RemoveItem IndexValue
For example, the following code removes the second item from the lstFood ListBox:
lstFood.RemoveItem 1
In applications where you have a ListBox from which you will allow users to remove items, you will want to remove the selected item. To do so, use the ListIndex property, as in the following example:
lstFood.RemoveItem lstFood.ListIndex
Now the issue of how to remove multiple items from a ListBox comes up. If you have a ListBox from which you will allow users to remove items, and you are allowing multiple selection, you must loop through the listbox in REVERSE: i.e., start the loop index at ListCount – 1 and end the loop index at zero.
The following code will remove the items that the user has selected from the lstFood listbox:
Dim intListX As Integer
For intListX = (lstFood.ListCount – 1) To 0 Step -1
If lstFood.Selected(intListX) Then
lstFood.RemoveItem intListX
End If
Next
Example: Adding and Removing Items with Two ListBoxes
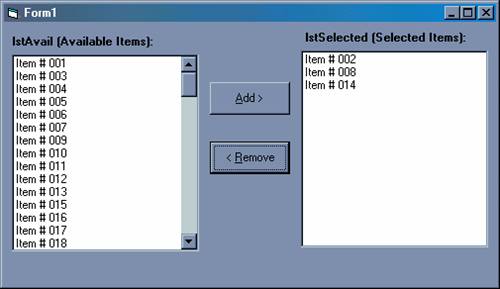
A commonly seen action in Windows programs is one in which you have two ListBoxes, where one ListBox contains all of the available items; the other is intended to contain selected items from the list of all available items. The user adds and removes items by selecting items from the ListBoxes and then clicking an appropriate command button. Consider the following interface:
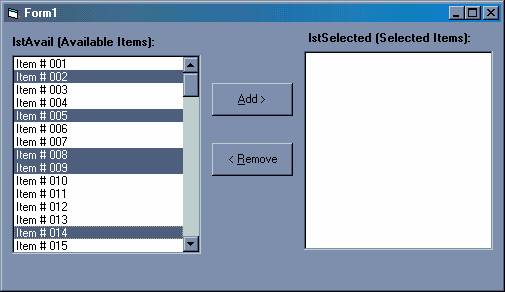
The above interface consists of two ListBoxes, named lstAvail and lstSelected. Both have their Sorted property set to True and their MultiSelect property set to Extended. The two command buttons are named cmdAdd and cmdRemove. To move the selected items from lstAvail to lstSelected, place the following code in the cmdAdd_Click event:
Private Sub cmdAdd_Click()
Dim intListX As Integer
For intListX = lstAvail.ListCount – 1 To 0 Step -1
If lstAvail.Selected(intListX) Then
lstSelected.AddItem lstAvail.List(intListX)
' If you are using the optional ItemData property array,
' add the following line to carry the "ItemData baggage" along ...
lstSelected.ItemData(lstSelected.NewIndex) = _
lstAvail.ItemData(intListX)
lstAvail.RemoveItem intListX
End If
Next
End Sub
As indicated by the comment in the above code, if you are using the optional ItemData property array, this ItemData "baggage" is not carried along automatically when you move an item from one list to another with the AddItem method. If you were to omit the line
lstSelected.ItemData(lstSelected.NewIndex) = lstAvail.ItemData(intListX)
the ItemData data would be deleted with the RemoveItem method.
After execution of the above code, the form will look like this:
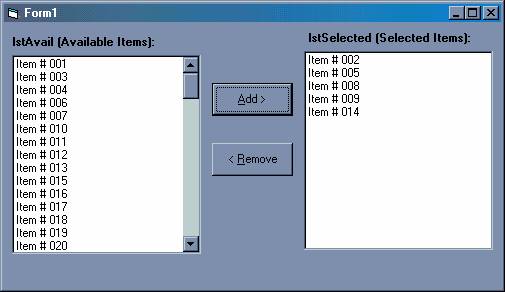
Note that the selected items were added to lstSelected and removed from lstAvail.
Now suppose the user wants to remove a few items from lstSelected and send them back to lstAvail. The user selects the items to remove:
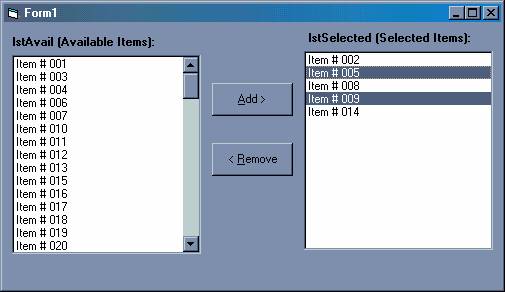
The user then clicks the Remove button, which contains the following code:
Private Sub cmdRemove_Click()
Dim intListX As Integer
For intListX = lstSelected.ListCount – 1 To 0 Step -1
If lstSelected.Selected(intListX) Then
lstAvail.AddItem lstSelected.List(intListX)
' If you are using the optional ItemData property array,
' add the following line to carry the "ItemData baggage" along ...
lstAvail.ItemData(lstAvail.NewIndex) = lstSelected.ItemData(intListX)
lstSelected.RemoveItem intListX
End If
Next
End Sub
The form then looks like this:
Note that the items that were selected in lstSelected were removed from lstSelected and added back to lstAvail.
Download the VB project code for this example here.
You'll notice that in the previous example, the code for cmdAdd_Click and cmdRemove_Click was identical, except for the names of the listboxes in question. This code could be consolidated into a single Sub that could be placed into a standard module and incorporated into any project where it is needed:
Public Sub MoveListBoxItems(lstListToAddTo As ListBox, _
lstListToRemoveFrom As ListBox)
Dim intListX As Integer
For intListX = lstListToRemoveFrom.ListCount – 1 To 0 Step -1
If lstListToRemoveFrom.Selected(intListX) Then
lstListToAddTo.AddItem lstListToRemoveFrom.List(intListX)
lstListToAddTo.ItemData(lstListToAddTo.NewIndex) _
= lstListToRemoveFrom.ItemData(intListX)
lstListToRemoveFrom.RemoveItem intListX
End If
Next
End Sub
With this Sub incorporated into your project, you could use the following code in the cmdAdd_Click and cmdRemove_Click events to call the MoveListBoxItems Sub:
Private Sub cmdAdd_Click()
MoveListBoxItems lstSelected, lstAvail
End Sub
Private Sub cmdRemove_Click()
MoveListBoxItems lstAvail, lstSelected
End Sub
Download the VB project code for this example here.
Checkbox-Style ListBoxes
VB5 introduced the Style property for ListBoxes, with the options 0 – Standard and 1 – Checkbox. The listbox examples we have been working with thus far all have had their Style property set to "0 – Standard" (which is the default style, and the only style of listbox available prior to VB5).
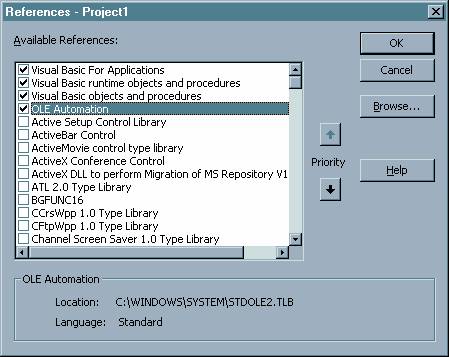
Checkbox-listboxes are seen in several Windows applications. In VB itself, if you go to the Project menu and select References, the following dialog box will be displayed (note that the "Available References" listbox is of the checkbox variety):
To incorporate a checkbox-listbox into your application, simply grab a listbox control from your toolbox and set its Style property to "1 – Checkbox". The combined checkbox-listbox functionality will be built-in. Be advised that when you use the checkbox style, the MultiSelect property must be set to "0 – None" (VB won't let you set it to "Simple" or "Extended"). This is because the checkboxes now implement the multiple-selection functionality – all the user has to do is click the checkboxes; they don't have to bother with holding down the Ctrl or Shift key while clicking.
As you do with the Standard style listbox, you determine which items the user selected by looping through the items in the listbox and testing the Selected Boolean property array. The only difference is in the visuals – with a standard listbox, all selected items appear highlighted; with a checkbox-listbox, the selected items have their checkboxes checked.
Following is a short demo of the checkbox-style listbox.
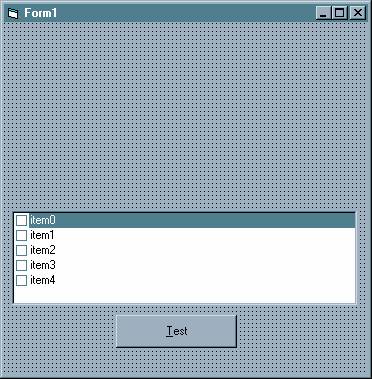
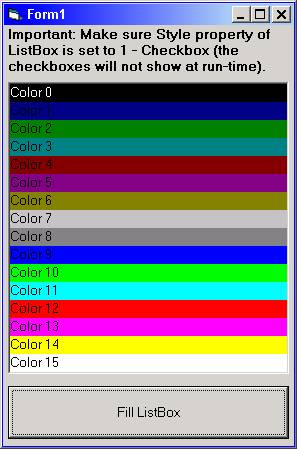
This is the form at design-time. It consists of a listbox named "lstTest", with the style set to "1 – Checkbox", and a few items added in the List property. It also contains a command button named "cmdTest".
The cmdTest_Click event procedure, which simply prints the selected items on the form, looks like this:
Private Sub cmdTest_Click()
Dim intX As Integer
Cls
Print "The selected items are:"
With lstTest
For intX = 0 To .ListCount - 1
If .Selected(intX) Then
Print .List(intX)
End If
Next
End With
End Sub
At run-time, after selecting a few items and clicking the Test button, the form looks like this:

Note that only the last item that the user checks will be highlighted; and this is true whether the user checked it to select the item OR to deselect it (clear the checkbox). Therefore, the fact that an item is highlighted does NOT mean that it is selected.
The item that is highlighted only affects the Text property of the listbox (looking at the form above, the value of lstTest.Text would be "item3", whether the user checked the box to select it OR to clear it). The Text property of the listbox is useful only when the user can make one selection from the listbox, NOT when they are doing multiple selections as is the case here. Therefore, you should always use the Selected property array to determine which items are selected in a checkbox-style listbox.
Download the VB project code for this example here.
*** BONUS MATERIAL ***
ListBox Procedures
Presented below are several examples of how to extend the functionality of the listbox. The remove duplicates, drag and drop, search, and tooltip examples are based on examples that have been posted on www.planet-source-code.com. The example showing how to add a horizontal scroll bar is based on information provided in the Microsoft article at this location: http://support.microsoft.com/default.aspx?scid=kb%3Ben-us%3B192184. The example showing how to set the backcolor of individual items is based on an example by Aaron Young, a talented programmer who frequently contributes to programming forum sites.
Remove Duplicate Entries in a ListBox
This example incorporates a general Sub procedure that you can use to remove duplicate entries from a listbox. The code for the Sub is:
'-----------------------------------------------------------------------------
Public Sub RemoveListBoxDuplicates(pobjLB As ListBox)
'-----------------------------------------------------------------------------
'REMOVE DUPLICATES FROM LISTBOX
Dim intI As Integer
Dim intJ As Integer
With pobjLB
For intI = 0 To .ListCount - 1
For intJ = .ListCount To (intI + 1) Step -1
If .List(intJ) = .List(intI) Then
.RemoveItem intJ
End If
Next
Next
End With
End Sub
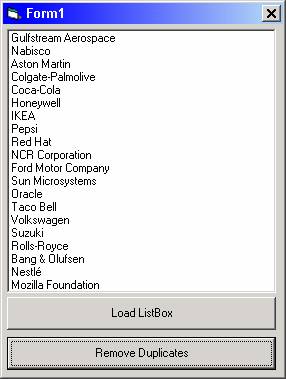
In the sample program, clicking the "Load ListBox" button loads the listbox with 100 entries, where an entry will be any one of 20 company names selected at random:
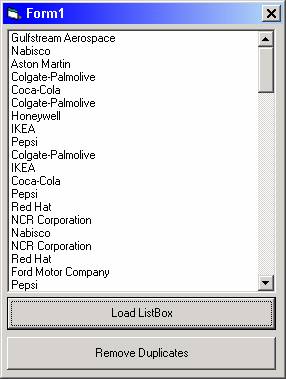
In the sample program, clicking the "Remove Duplicates" button implements the Sub procedure described above to remove all duplicate entries:
Download the sample program here.
Notes:
You can modify this procedure to work with a ComboBox by modifying the argument in the procedure header as follows:
Public Sub RemoveListBoxDuplicates(pobjLB As ComboBox)
You can modify this procedure to work with a ListBox OR a ComboBox by modifying the argument in the procedure header as follows:
Public Sub RemoveListBoxDuplicates(pobjLB As Control)
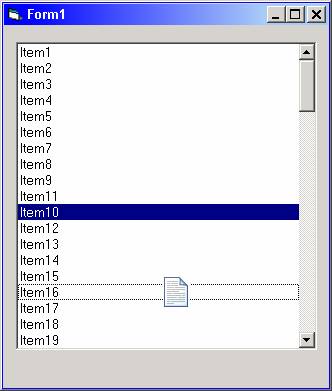
Drag and Drop within a ListBox
This example shows how you can rearrange the items in a listbox using drag and drop.
Download it here.
Variation: This example demonstrates how you can drag an item from one listbox to another; when the item is dropped into the target listbox, it replaces the highlighted item.
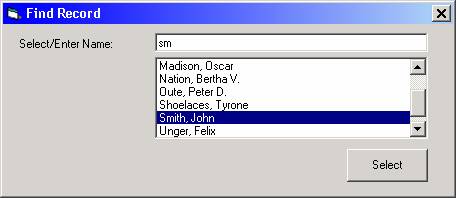
Search-as-you-type for an Item in a ListBox
This example shows how you can use a textbox in conjunction with a listbox to implement "search-as-you-type" functionality.
Download it here.
Show Tooltips for Individual Items in a ListBox
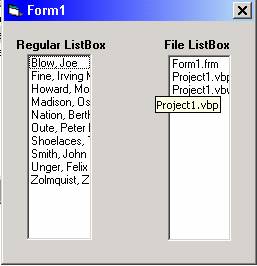
This example shows how you can show a tooltip for an individual item in a listbox when you move the mouse over the item. This can be especially useful for long items that do not fully display in the listbox. This technique can also be used for the FileListBox.

Download it here.
Add a Horizontal Scroll Bar to a ListBox
The normal VB ListBox that comes with does not have a horizontal scroll bar. This can be a problem when an item in a ListBox extends past the boundaries of the ListBox. We saw one way around this in the example above by using tooltips. This example shows how you can actually add a horizontal scroll bar to a listbox by calling the Windows API SendMessage function with the LB_SETHORIZONTALEXTENT constant.
Download it here.
Set the Back Color of Individual Items in a ListBox
This example uses subclassing to set the backcolor of individual items in a listbox.
Download it here.