The Print Method – Part 4
Using the Spc(n) Separator
Note: The formatting option for Print discussed in this topic is only meaningful if the object you are printing to is set to a monospaced font (like Courier or Fixedsys). The output will not look right if the object is set to a proportional font (like the default MS Sans Serif, Times New Roman, etc.).
Another function that controls horizontal spacing on the line is SPC(n). Like the Tab function, Spc can be used only with Print statements. Spc, however, differs from Tab in that Tab moves the cursor or print pointer to an absolute position on the line, whereas Spc moves the cursor or print pointer n spaces to the right of the last item printed.
Consider the following program segment:
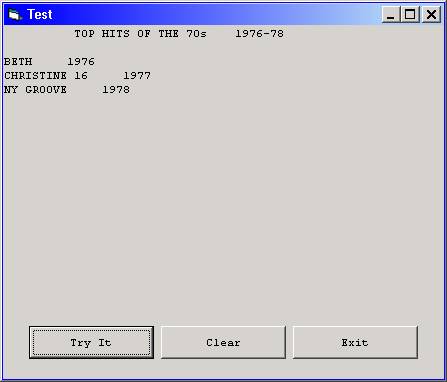
Print Spc(10); "TOP HITS OF THE 70s"; Spc(4); "1976-78"
Print "BETH"; Spc(5); "1976"
Print "CHRISTINE 16"; Spc(5); "1977"
Print "NY GROOVE"; Spc(5); "1978"
The Print statements above would cause the following output to be generated :
1 1 2 2 3 3 4 4 5 5
1...5....0....5....0....5....0....5....0....5....0....5...
TOP HITS OF THE 70s 1976-78
BETH 1976
CHRISTINE 16 1977
NY GROOVE 1978
Note: In all the "Spc" examples above, only string constants were used in the expression list, but of course numeric constants and string or numeric variables can certainly be used (and the "leading sign / trailing space" rule would still apply for numeric items).
(Note also that "Spc" was probably not the best choice here for the intention of lining up the data properly.)
If you wish, set up another "Try It" project, and place the sample Print statements in the cmdTryIt_Click event, as follows:
Private Sub cmdTryIt_Click()
Print Spc(10); "TOP HITS OF THE 70s"; Spc(4); "1976-78"
Print "BETH"; Spc(5); "1976"
Print "CHRISTINE 16"; Spc(5); "1977"
Print "NY GROOVE"; Spc(5); "1978"
End Sub
When you run the project and click the "Try It" button, the output should look like this:
Download the VB project code for the example above here.